
Instructions for EXPERTS AND ADVANCE VARIANT
MAGBASA MABUTI!⚠️ Warning: Do Not Plug a Bootable USB into a Virus-Infected PC! To repair a PC infected with a virus, make sure to boot the flash drive directly into the BIOS/Boot Menu. Do not let the Infected Windows OS read the USB to prevent any potential spread of the virus into USN Flash Drive, which can totally damage it.✅ 🇮 🇳 🇸 🇹 🇷 🇺 🇨 🇹 🇮 🇴 🇳 🇸 :1. Insert the Bootable USB into the Computer. Plug your bootable USB drive into the target computer.
2. Set Up Your PC to Boot from USB
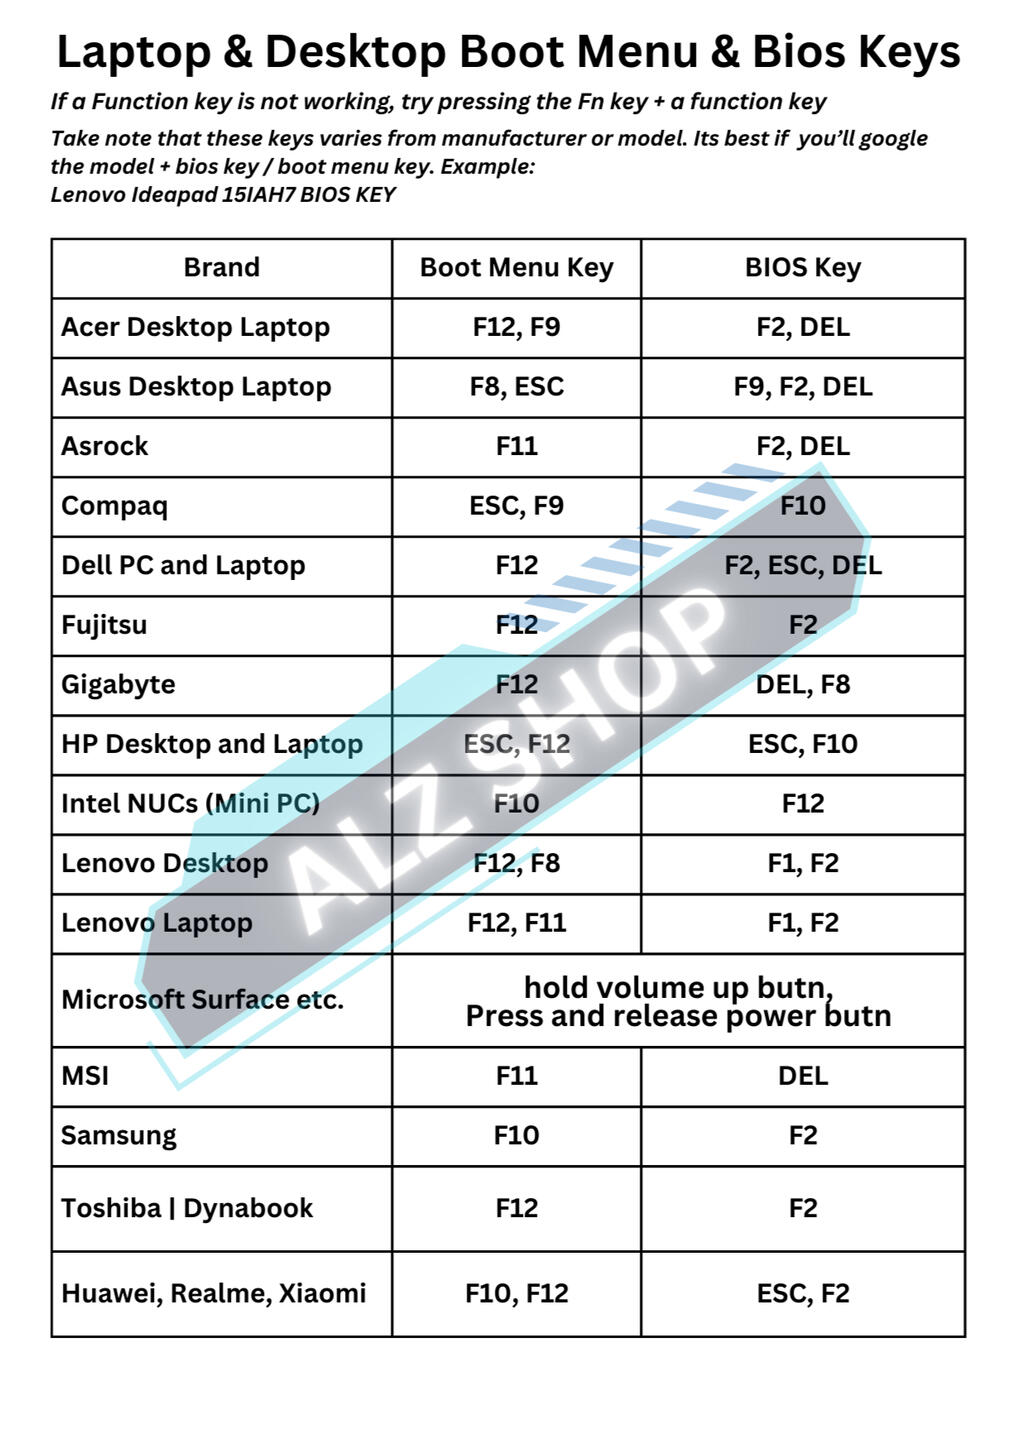
Access BIOS/UEFI Settings: Restart the computer and press the designated key (often F2, F10, F12, or DEL) to enter BIOS/UEFI.
Change Boot Order: Once in BIOS, go to the “Boot” tab and set your USB drive as the first boot option. Save and exit to restart the computer.3. Start the Windows Installation Process
-Select your Operating System.
-Begin Windows Setup: Select your language, time, keyboard preferences, then click Next and Install Now.
-Select Installation Type: Choose Custom: Install Windows only (advanced) to perform a clean installation.
-Choose Installation Location: Select the drive where you want Windows installed (usually “Drive 0”). You may format it if needed, but note this will delete all data on it.4. Complete Installation
Set Up Windows: Follow the on-screen instructions to configure your user account, connect to Wi-Fi, and adjust settings.

Instructions for EXPERTS AND ADVANCE VARIANT
MAGBASA MABUTI!⚠️ Warning: Do Not Plug a Bootable USB into a Virus-Infected PC! To repair a PC infected with a virus, make sure to boot the flash drive directly into the BIOS/Boot Menu. Do not let the Infected Windows OS read the USB to prevent any potential spread of the virus into USN Flash Drive, which can totally damage it.✅ 🇮 🇳 🇸 🇹 🇷 🇺 🇨 🇹 🇮 🇴 🇳 🇸 :1. Insert the Bootable USB into the Computer. Plug your bootable USB drive into the target computer.
2. Set Up Your PC to Boot from USB
Access BIOS/UEFI Settings: Restart the computer and press the designated key (often F2, F10, F12, or DEL) to enter BIOS/UEFI.
Change Boot Order: Once in BIOS, go to the “Boot” tab and set your USB drive as the first boot option. Save and exit to restart the computer.3. Start the Windows Installation Process
-Select your Operating System.
-Begin Windows Setup: Select your language, time, keyboard preferences, then click Next and Install Now.
-Select Installation Type: Choose Custom: Install Windows only (advanced) to perform a clean installation.
-Choose Installation Location: Select the drive where you want Windows installed (usually “Drive 0”). You may format it if needed, but note this will delete all data on it.4. Complete Installation
Set Up Windows: Follow the on-screen instructions to configure your user account, connect to Wi-Fi, and adjust settings.

TUTORIAL FOR YOUR BOOTABLE USB DRIVE
Reformating your PC
For BEGINNER VARIANTS, Click the link below to watch the tutorial:
Instructions for NON-BEGINNERS⚠️ Warning: Do Not Plug a Bootable USB into a Virus-Infected PC! To repair a PC infected with a virus, make sure to boot the flash drive directly into the BIOS/Boot Menu. Do not let the Infected Windows OS read the USB to prevent any potential spread of the virus into USN Flash Drive, which can totally damage it.✅ 🇮 🇳 🇸 🇹 🇷 🇺 🇨 🇹 🇮 🇴 🇳 🇸 :1. Insert the Bootable USB into the Computer. Plug your bootable USB drive into the target computer.
2. Set Up Your PC to Boot from USB
Access BIOS/UEFI Settings: Restart the computer and press the designated key (often F2, F10, F12, or DEL) to enter BIOS/UEFI.
Change Boot Order: Once in BIOS, go to the “Boot” tab and set your USB drive as the first boot option. Save and exit to restart the computer.3. Start the Windows Installation Process
-Select your Operating System.
-Begin Windows Setup: Select your language, time, keyboard preferences, then click Next and Install Now.
-Select Installation Type: Choose Custom: Install Windows only (advanced) to perform a clean installation.
-Choose Installation Location: Select the drive where you want Windows installed (usually “Drive 0”). You may format it if needed, but note this will delete all data on it.4. Complete Installation
Set Up Windows: Follow the on-screen instructions to configure your user account, connect to Wi-Fi, and adjust settings.
These serial keys are only Generic Keys for all editions so you can freely choose which Windows_Edition you would like to install. After registering these keys, you may look the activator folder of Windows in the flash drive to finish the installation process.If your PC has a built-in license (most of the time uses Windows Home Single Edition), you don't need to activate your PC after all.In short, magkaiba ang WindowsProduct_Key sa Activation License. Basahin nyo ang Activation License Manual na kasamang dumating sa BOOTABLE USB! nakalagay na sa baba ang Picture kung saan lang gagana ang Product key:

Windows11/10
| Windows Edition | License |
|---|---|
| Windows 11 Home Home Single Language | BT79Q-G7N6G-PGBYW-4YWX6-6F4BT |
| Windows 11 Home | YTMG3-N6DKC-DKB77-7M9GH-8HVX7 |
| Windows 11 Pro | VK7JG-NPHTM-C97JM-9MPGT-3V66T |
| Windows 11 Pro for Workstations | DXG7C-N36C4-C4HTG-X4T3X-2YV77 |
| Windows Edition | License |
|---|---|
| Windows 8 (core) | FB4WR-32NVD-4RW79-XQFWH-CYQG3 |
| Windows 8 Pro | XKY4K-2NRWR-8F6P2-448RF-CRYQH |
| Windows 8 Pro with Media Center | RR3BN-3YY9P-9D7FC-7J4YF-QGJXW |
| Windows 8.1 (core) | 334NH-RXG76-64THK-C7CKG-D3VPT |
| Windows 8.1 (core single language) | Y9NXP-XT8MV-PT9TG-97CT3-9D6TC |
| Windows 8.1 Pro | XHQ8N-C3MCJ-RQXB6-WCHYG-C9WKB |
| Windows 8.1 Pro with Media Center | GBFNG-2X3TC-8R27F-RMKYB-JK7QT |
| Windows 8.1 Enterprise | MNDGV-M6PKV-DV4DR-CYY8X-2YRXH OR FHQNR-XYXYC-8PMHT-TV4PH-DRQ3H |